
Success with PETG does not happen by chance. You get great results when you use the right settings and techniques. This material is strong, durable, and friendly for beginners once you learn its quirks. PETG filament bridges the gap between easy PLA and tough engineering plastics.
You may feel frustrated by stringing or bed adhesion problems at first. Do not worry. Small adjustments to temperature, speed, and retraction make a big difference. You will learn how to prepare your build surface, fix common issues, and finish your prints with confidence. With a little practice, PETG can become your go-to material for functional parts.
Key Takeaways
-
PETG is strong, durable, and beginner-friendly. It bridges the gap between easy PLA and tough engineering plastics.
-
Use nozzle temperatures between 230-250°C and bed temperatures between 70-90°C. These settings ensure good layer adhesion and prevent warping.
-
Prepare your build surface with a glue stick or hairspray. This barrier prevents PETG from bonding too strongly to glass or PEI sheets.
-
Dry your PETG filament before printing. Moisture causes stringing and bubbling. Store spools in airtight containers with desiccant.
-
Adjust retraction and cooling to reduce stringing. Use a cooling fan at 30-50% and retraction settings based on your extruder type.
PETG Basics and Benefits
Key PETG Properties
PETG stands for polyethylene terephthalate glycol. Manufacturers add glycol to reduce the crystallinity of standard PET. This modification makes the material clearer and easier to print. You get a filament that flows smoothly and bonds well between layers.
The mechanical properties of PETG make it stand out. You can review typical values in the table below.
|
Property |
Value |
|---|---|
|
Tensile Strength |
50-55 MPa |
|
Flexural Modulus |
2.1-2.3 GPa |
These numbers show that PETG offers a solid balance of strength and stiffness. The material also handles heat better than PLA. Consider this important detail about temperature limits:
PETG has a glass transition temperature of 80–85°C. Above 85°C, PETG begins to soften and become less rigid, though it does not melt. From a practical perspective, PETG should not be used for parts subjected to prolonged heat above 70–80°C. Its heat deflection temperature is typically 65–75°C, which is the temperature that can cause deformation of a printed piece.
You should keep these limits in mind for load-bearing parts. PETG works well in warm environments where PLA would fail.
Why PETG Beats PLA for Functional Parts
PLA has higher raw tensile numbers on paper. However, PLA is brittle and snaps without warning under impact. PETG behaves differently in real-world use.
-
Impact resistance: PETG offers useful toughness compared to ordinary PLA, making it more durable under impact.
-
Interlayer adhesion: PETG bonds exceptionally well during printing, resulting in stronger Z-axis strength and fewer weak points than PLA.
-
Flexibility: PETG can bend slightly under load and return to shape, unlike PLA which is brittle and snaps.
These traits matter for brackets, fixtures, and mechanical components. A dropped PLA part may crack. A PETG part often flexes and survives.
One final note: PETG is hygroscopic. The material absorbs moisture from the air. You should store your petg filament in a dry container with desiccant. This step prevents stringing and bubbling during printing.
Essential PETG Filament Settings
Nozzle and Bed Temperatures
Temperature control is the foundation of successful PETG printing. Your nozzle working range sits between 220 and 260 °C. The sweet spot for most prints falls between 230 and 250 °C, with 240 °C being a common starting point. Higher temperatures within this range produce maximum durability and layer adhesion. Lower temperatures around 230 °C increase the risk of poor fusion between layers, which compromises strength. Raise your nozzle temperature in small increments of 5 °C to improve fusion between layers.
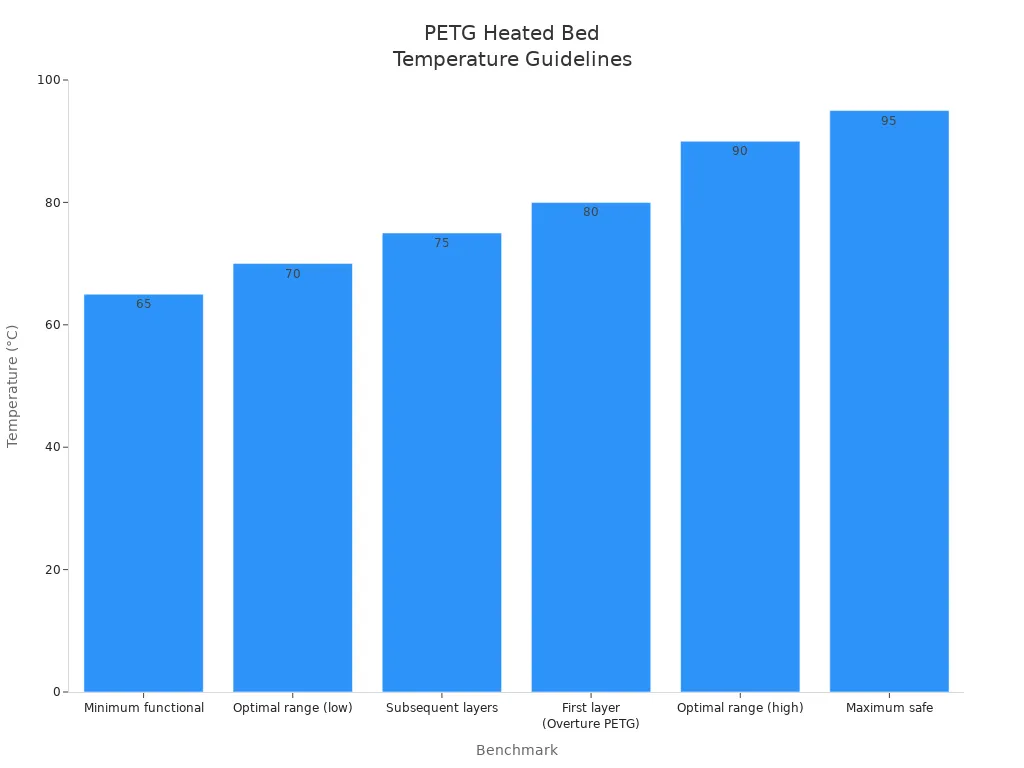
The heated bed is not optional for PETG. You need it to prevent warping and ensure proper first-layer adhesion. The optimal bed temperature range is 70 to 90 °C. This range keeps the bed above PETG's glass transition temperature without deforming the bottom layers. Start with a first-layer bed temperature of 70 to 80 °C. If corners begin lifting, increase bed temperature in 5 °C increments up to a maximum of 85 °C. Keep bed temperature steady throughout the print. Dropping it after the first layer causes the bottom to cool too fast and pull away.
|
Setting |
Recommendation |
|---|---|
|
Nozzle Temperature |
220–260 °C (sweet spot 230–250 °C; ~240 °C common) |
|
Bed Temperature |
70–90 °C (80 °C standard; 85–90 °C for glass; 70–80 °C for textured PEI) |
|
Cooling Fan |
30–50%; off or minimal for first layers |
|
Print Speed |
30–60 mm/s |
|
Retraction |
Slightly higher distance than PLA; moderate speed; faster travel moves |
A Prusa MK4S user reported bed adhesion issues with Elegoo Rapid PETG and found that raising the bed temperature to 85 °C helped improve adhesion, though further tuning was still needed. This highlights that community members often adjust bed temperature upward to around 85 °C for specific PETG brands to combat lifting and warping.
Speed, Cooling, and Retraction
Print speed for PETG should be slower than PLA. Aim for around 40 mm/s as a baseline. The broader recommended range is 30 to 60 mm/s. Some users report stability at approximately 90 mm/s, but reduce speed when using high-flow parameters. Cooling fan settings matter greatly. Run your fan at 30 to 50 percent. Excessive cooling makes PETG brittle and weakens layer bonding. Turn the fan off or keep it minimal for the first layers.
Retraction tuning is critical for reducing oozing and stringing. The correct settings depend on your extruder type.
|
Extruder Type |
Retraction Distance |
Retraction Speed |
|---|---|---|
|
Direct drive |
0.5–2 mm |
20–45 mm/s |
|
Bowden |
3–6 mm |
20–45 mm/s |
For direct drive extruders, start at 1 mm retraction distance and adjust in 0.5 mm increments. For Bowden extruders, start at 5 mm and adjust in 0.5 mm increments. Enable Wipe Before Travel and increase retraction speed. Exceeding recommended distances often leads to jams. Speeds that are too fast risk grinding, while too slow may not eliminate stringing.
Keep layer height moderate for strong layer adhesion. A flow ratio between 0.93 and 0.96 works well. Reduce to 0.93–0.94 if clogging occurs. Line width should fall between 0.36 and 0.40 mm for a 0.4 mm nozzle. Limit wall count to 6 or fewer and infill density to 50 percent or less with a spiral pattern. Apply glue or enable a brim to prevent warping.
The EPELAY PETG 3D Printer Filament 1.75mm, 1kg offers a consistent 1.75mm diameter for stable feeding and jam-free extrusion. Material-specific starting guidance helps you dial in settings quickly. This petg filament is vacuum-sealed with desiccant to protect against moisture. With these settings as your starting point, you can print this petg filament with confidence.
Bed Adhesion and Surface Prep
Choosing a Build Surface
PETG bonds aggressively to many common build surfaces. This strong grip helps your first layer stick. It also creates a serious risk. PETG can bond destructively to glass and smooth PEI. The material may pull chunks from a glass plate. It can permanently bond to a PEI sheet. You must choose a surface that balances adhesion with safe release.
Glass and PEI both work well when you prepare them correctly. The table below shows the recommended setup for each surface type.
|
Surface Type |
Recommended Temperature |
Release Agent Needed? |
|---|---|---|
|
Glass |
70°C |
Yes — glue stick or hairspray as a barrier to prevent glass damage |
|
Smooth PEI |
70°C–75°C |
Yes — glue stick |
A glue stick or hairspray acts as a barrier layer. This layer stops the petg filament from fusing directly to the build plate. For PEI, manufacturers specifically advise a glue stick. The sheet provides good adhesion when hot and releases when cool. If a part sticks excessively, place the plate in a freezer to help remove it.
Leveling and Adhesive Tips
Proper leveling is the foundation of reliable bed adhesion. A well-leveled bed ensures the nozzle deposits material at a consistent height across the entire plate. You should check your first layer carefully. The material should form a slightly squished line. Lines that sit round on top of the bed indicate the nozzle is too high. Lines that appear transparent or extremely thin mean the nozzle is too low. Adjust your bed screws or use your printer's leveling feature until the first layer looks uniform.
A light spritz of adhesive smeared around the plate helps prints pop off easily. Glue sticks are easy to apply and serve a dual purpose. They help PLA adhere to glass while preventing PETG from over-bonding to PEI. For extra grip with filaments like PETG and ABS, adhesives such as Magigoo or glue stick are recommended. Apply a thin, even layer across the print area. You do not need a thick coating. A thin smear provides enough of a barrier to protect your surface.
Consider these practical tips for consistent results:
-
Glass: Use an adhesive such as glue stick or hairspray as a release agent to prevent PETG from tearing chunks of glass.
-
BuildTak PEI: Apply a thin smear of an adhesive to prevent permanent bonding. The sheet provides good adhesion when hot and releases when cool.
-
For PETG on PEI, use a glue layer as a release agent when needed, with bed temperatures between 70–85°C.
Clean your build surface between prints. Residue from previous prints can create uneven adhesion. Wipe the plate with isopropyl alcohol after removing each part. Reapply a fresh layer of adhesive before starting a new print. This routine keeps your surface in good condition and your results predictable.
Fixing Common PETG Problems
Even with good settings, PETG can produce stringing, warping, or weak layers. Most issues have clear causes and straightforward fixes. Here is how to diagnose and solve two common problem areas.
Stringing, Oozing, and Blobs
Stringing and oozing happen when filament leaks from the nozzle during travel moves. The primary causes include nozzle temperature that is too high, improper retraction, and moisture inside the filament. PETG is naturally sticker than PLA, so you must control ooze carefully.
Start by drying the material. Wet PETG produces audible popping sounds during extrusion. It also causes excessive stringing and pitted surfaces. Dry the filament at 60°C to 65°C for 8 hours for moderate moisture. For heavy exposure, dry for 12 hours. Never exceed 70°C.
Next, tune retraction. For a Bowden extruder, set retraction distance to 3–6 mm at a speed of 20–45 mm/s. For a direct drive, use 0.5–2 mm at 20–45 mm/s. Travel speed should be 150–200 mm/s to minimize ooze. Enable a Z-hop height of 0.2 mm to lift the nozzle. Adjust coasting gradually if you see blobs. Lower the nozzle temperature slightly. If you print at 250°C, try 240°C. A lower temperature reduces the runny behavior of the filament. Clean a dirty nozzle regularly to prevent leaks.
Warping and Weak Layer Bonding
Warping occurs when parts cool unevenly and lift from the bed. PETG has a low warping tendency and prints well on open-frame printers. However, large prints in cold rooms can still lift. Use a heated bed at 70–90°C. Keep the room temperature at least 20°C. Block drafts from windows, fans, or air conditioning vents. An enclosure is not necessary for PETG, but placing a cardboard box over the printer helps stabilize temperature for very large parts.
Weak layer bonding comes from excessive cooling or printing too fast. Set cooling fan to 30–50% and keep it off for the first few layers. Print speed should stay between 30 and 60 mm/s. If layers appear weak, reduce fan speed and lower print speed further. Ensure good first-layer adhesion with a well-leveled bed and a thin layer of adhesive.
By addressing these causes, you can reduce stringing, warping, and weak bonds in your petg filament prints.
Post-Processing and Storage
Cleaning Up PETG Prints
PETG's toughness works against you when you remove supports. The material bends instead of snapping cleanly. Supports can leave small tears or cuts on the surface of your print. Use flush cutters or pliers with care. Twist and pull slowly to avoid gouging the part. A sharp hobby knife helps trim leftover nubs. Sand the area with fine grit paper for a smooth finish.
You can also smooth rough spots with a heat gun. Move the gun quickly over the surface. The plastic will gloss over and hide minor scars. Do not hold the heat in one spot. PETG softens fast and loses shape.
Drying and Storing PETG Filament
Moisture is the enemy of clean prints. Dry your petg filament before use to prevent stringing and bubbling. Follow these parameters:
-
Drying temperature: 60°C to 65°C
-
Drying time: 8 hours for moderate exposure; 12 hours for heavy humidity
-
Maximum temperature: never exceed 70°C
Set your dryer to 65°C with the fan on. Leave the spool inside for 8 hours. If problems persist, run additional 3-hour cycles. A temperature of 50°C is too low to work.
Storage matters just as much. Keep spools in an airtight container with desiccant. Add 20–50 g of silica gel per spool. Place a digital hygrometer inside and keep humidity below 20%. Check stored filament every few months. Refresh the desiccant when humidity rises.
A user stored about ten reels for more than six months. Some vacuum bags had lost their vacuum, while others still held a good vacuum, but all reels reportedly showed 43–45% humidity.
Vacuum sealing only removes moisture from the air inside the bag. It does not remove moisture already absorbed within the filament. Plastic bags are not completely moisture-tight. Water vapor can slowly diffuse through the plastic even when the bag remains sealed. The EPELAY PETG 3D Printer Filament 1.75mm, 1kg comes vacuum-sealed with desiccant to help protect against moisture. For food-safe use, choose a reputable US filament manufacturer and follow best practices.
You now have a clear path to reliable PETG prints. Dial in your temperature and speed first. Start near 245°C and adjust by 5°C until layers fuse well. Prepare your bed with a glue stick release agent. Dry your petg filament at 65°C for 8 hours if you hear popping. Address stringing and warping early before they ruin a long print.
PETG rewards patience and small adjustments. Test one setting at a time, keep notes, and practice with small prints. Soon this strong, durable material will become a trusted tool in your workshop.
FAQ
What nozzle temperature should I start with for PETG?
Begin around 240 °C. This value sits in the middle of the 220–260 °C working range. If your layers do not fuse well, raise the temperature by 5 °C. If you see excessive stringing, lower it slightly. Small steps work best.
Why does my PETG print lift off the bed?
Your bed may be too cool. Set the heated bed between 70 and 90 °C. Cold room air also causes lifting. Block drafts from windows and vents. A thin layer of glue stick helps the first layer hold tight.
How do I stop stringing on my PETG parts?
Dry your filament first. Moisture causes most stringing problems. Heat the spool at 60–65 °C for 8 hours. Then tune retraction for your extruder type. Lower the nozzle temperature a little. Faster travel moves also reduce ooze.
Can I print PETG without a heated bed?
No. A heated bed is essential for PETG. The material needs a warm surface to stick and to cool evenly. Without heat, your part will warp or detach. Use a bed temperature between 70 and 90 °C for reliable results.
How should I store PETG filament between prints?
Keep spools in an airtight container with desiccant. Add 20–50 g of silica gel per spool. Track humidity with a digital hygrometer and stay below 20%. Dry the filament before printing if you hear popping sounds.


